

¡Lo puedes lograr!
Explora, aprende, inspírate.
Capa de piedra 101

What Is Epoxy Flooring? Benefits, Types, Cost & Installation
Epoxy flooring is a seamless floor coating made by mixing epoxy resin with a hardener. That mixture creates a chemical reaction that cures into a rigid, durable surface designed to resist stains, chemicals, impact, and daily wear. It is a popular DIY flooring option for garages, basements, workshops, and modern living spaces.
Aprende más
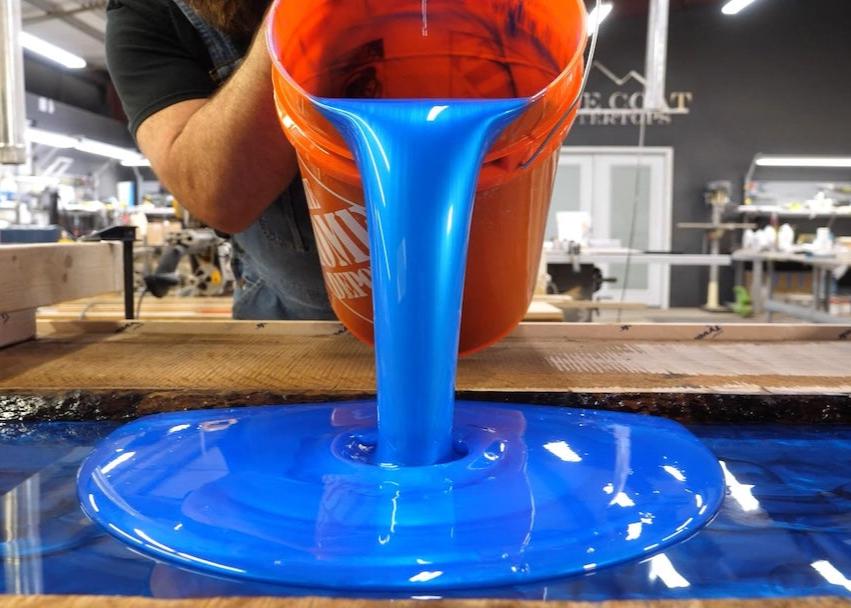
Cómo crear mármol exótico blanco con epoxi
Transform your countertops into the look of luxurious, high-end marble with Stone Coat Countertops APEX Polyaspartic. This step-by-step guide shows you how to create a bold, smoky, high-contrast White Exotic marble-inspired countertop using the dirty pour technique with the APEX system and premium pigments. Designed for both new builds and countertop transformations, the dirty pour technique creates dramatic movement while preserving the bright, clean white space that gives the finished surface its refined, statement-making look. The key is restraint: too much dark color, over-blending, or repeated passes can quickly turn soft smoky veining into a muddy gray surface. Follow the guide and video below to create controlled movement, lasting depth, and a durable professional-grade finish with elegant contrast. How to Create White Exotic Marble Countertops with Stone Coat APEX Polyaspartic Project Supplies: White Exotic Marble Countertop Kit Epoxy Countertop Tool Kit Mixing bucket Microfiber roller kit Ultimate Top Coat (optional) NOTE: This White Exotic Marble recipe uses Stone Coat APEX, our next-generation polyaspartic countertop coating system. APEX is not epoxy and should not be mixed, primed, torched, or top-coated using legacy epoxy instructions or products. If you previously used our White Exotic Marble Epoxy Kit, this updated APEX method is the current recommended system for bright white Carrara-style countertops. Before you start: Whether you’re pouring APEX over an existing countertop—like tile or laminate—or fabricating a new surface from MDF, each approach has unique preparation steps to ensure maximum adhesion. For detailed instructions, check out our specific tutorials. This recipe begins with your surface fully prepped and ready for a stunning countertop transformation. Proper prep is especially important for bright white and light-colored designs. Before applying APEX Poly Fuse Countertop Primer, make sure the surface is clean, dry, smooth, and free from dust, grease, trapped moisture, damp filler, loose paint, silicone, slick finishes, or under-cured layers. Taking the time to prepare the surface correctly helps create a clean foundation for the bright, controlled finish this technique is designed to achieve. Step 1: Clean and Prep Surface Remove all grease and grime from your surface using TSP or a heavy-duty degreaser, then sand with 80-120 grit sandpaper for strong adhesion. Sand and smooth any bumps or rough areas, then clean the surface thoroughly to remove all dust and debris. If you are going over a surface with damage, seams, gaps, or uneven areas, fill those first with Bondo or an approved filler to create a smooth, uniform surface. Allow the filler to dry fully, then sand it smooth and clean thoroughly before priming. APEX Poly Fuse Countertop Primer should be used as the first step in the APEX countertop system. Apply thin coats of Poly Fuse Countertop Primer to the countertop surface, edges, and backsplash. Allow the first coat to dry for 45 minutes to 1 hour before applying the second coat. After the second coat, allow the primer to fully dry and off-gas before applying APEX Polyaspartic Countertop Coating. For laminate, allow APEX Poly Fuse Primer to dry aminimum of 6 hours and up to 24 hours before applying APEX Polyaspartic. Recommended dry times after the second coat of Poly Fuse are 6 to 8+ hours over non-porous surfaces such as laminate, granite, solid surface, and similar materials, and 5 to 6+ hours over porous surfaces such as plywood, MDF, and similar materials. The primer can also be allowed to dry overnight or up to 24 hours before pouring APEX. If the primer sits overnight, lightly sand the primed surface before pouring APEX Polyaspartic, then clean thoroughly to remove all dust and debris before pouring. APEX Poly Fuse Countertop Primer is formulated to create a strong bond between the properly prepared substrate and the APEX coating system. Do not use Epoxy Undercoat or any other primers beneath APEX. Common mistakes to avoid include coating over dust, trapped moisture, loose paint, slick surfaces, silicone, grease, or under-cured layers. Do not rush the primer’s dry time. Once the primer is fully dry, lightly sand with 220-grit sandpaper if needed, then remove all remaining dust before continuing with APEX. Create a Tape Dam: Create a tape dam around the countertop edges using painter’s tape. Start with one row of tape placed about midway up the edge, allowing the tape to extend approximately 1/2 inch above the countertop surface. This creates the dam that will help hold the APEX material in place during the pour. To make sure the tape is secure, apply a second row of painter’s tape from midway down the edge toward the bottom edge. Take your time pressing the tape firmly along the entire edge, then roll the bottom edge of the tape underneath the countertop for a tight seal. A tape dam is recommended for pours that require more than 7 ounces of APEX per square foot. Because an APEX dirty pour typically uses 8 to 10 ounces per square foot, the tape dam helps hold the material in place until it reaches the proper stage to flow cleanly over the edges. Step 2: Pour Countertop Coating (Hand Meld Method) Prepare the APEX Countertop Coating: Ensure the APEX Poly Fuse is Dry: Before you begin, make sure the primer on your countertop is completely dry (see above). This is crucial for proper adhesion and a smooth finish. Stage Everything: Before mixing, stage products, cups, sticks, gloves, timer, spreaders (if applicable), colorants, dyes, powders, tape, popsicle sticks, and APEX Surface Control Finishing Spray. Mix the APEX Polyaspartic: Calculate the amount of APEX Countertop Coating you'll need for the dirty pour technique. Plan 8–10 ounces of total mixed APEX per square foot. Do not apply less than 8 oz. Measure 2 parts A to 1 part B by volume in a clean graduated container, keeping the batch maximum of 1.5 gallons in mind. Example from this project: 6 ft x 2 ft = 12 sq ft 12 sq ft x 8 oz = 96 oz total mixed APEX 12 sq ft x 10 oz = 120 oz total mixed APEX * This estimate does not include additional material needed for edges, backsplashes, waste, or other project-specific requirements. Mix Thoroughly: Mix for 2 minutes total and scrape sides/bottom halfway. Do not exceed 1.5 gallons total mixed APEX per bucket/batch. For batches 2.5 quarts or lower, mix by hand with a flat-bottom paint stick. For larger batches, use a paddle mixer on a drill at low to medium speed. Try to incorporate as little air into the material while mixing as possible. Proper mixing is essential for the coating to cure correctly. Separate for Tinting: Divide the Mixture: Split the mixed APEX Polyaspartic into recipe cups promptly. Proper Color Ratio for White Exotic Marble: 96% White Base Colors (24% each Opaque and Translucent Poly White Countertop Dye; 24% White Metallic Pigment Powder; 24% Diamond Dust Metallic Pigment Powder) – 4% Accent Colors (2% Black Dye; 2% Silver Metallic Pigment Powder) Use Minimal Darker Colors: For this dirty pour finish, only a small amount of Silver Metallic Powder & Black Resin Dye is needed; a little goes a long way. Example Mixture for 192 Ounces (1.5 gallons) of APEX: White Dye Mixture – Opaque: 46 ounces White Dye Mixture – Translucent: 46 ounces White Metallic Mixture: 46 ounces Diamond Dust Metallic Mixture: 46 ounces Black Dye Mixture: 4 ounces Silver Metallic Mixture: 4 ounces Adjust the ratio as desired for your specific finish Create Black and White Dye Colors: Use Black Dye sparingly, as dark colors can quickly overpower a bright white design. Use the APEX Poly White Dye to create large buckets of white base at about 50% opaque white / 50% translucent white. Using APEX Poly White Dye: For a solid, opaque color—especially with lighter shades like white—add 10–15 drops of Stone Coat Countertops Poly White Dye per 16 ounces of APEX Polyaspartic. Mix carefully. Important: Avoid Excessive Dye: Adding too much dye can prevent the material from hardening properly and may result in a sticky or soft surface. Understanding Dyes vs. Pigments: Dyes provide uniform color without shimmer, while pigments offer metallic effects. Combining them can create unique finishes. Add Metallic Pigment Powder: Measure the Pigment: Add 2–3 tablespoons of PolyColor Metallic Pigment Powder per 16 ounces of APEX Polyaspartic. Adjust the amount based on the color intensity you desire. Incorporate the Pigment: Stir the pigment into the material until it's fully dispersed. Scrape the sides and bottom of the container to prevent unmixed particles, which can affect the appearance and curing. Understanding Pigments: Metallic pigments add depth and a shimmering effect, creating a dynamic look that changes with lighting and viewing angle. . Test the Mixture: Use the Mixing Stick Test: After mixing, lift the stir stick out of the material and hold it horizontally. As the material levels out to about 1/8", you'll see how the color and additives will appear when applied. If you can see the stick, do not pour yet. Evaluate Opacity and Effect: This test helps you assess whether the material has reached your desired opacity and effect. It's easier to adjust the mixture now than after it's poured. Adjust if Necessary: If any of the colors are too light or not vibrant enough, add small increments of pigment or dye and mix thoroughly before testing again. Build the White Exotic Dirty Pour Bucket: Pour the tinted colors into a larger bucket in a random layered pattern. Do not stir the colors together. Over-blending will remove the contrast and movement before the material ever reaches the countertop. For White Exotic, white is the foundation. The smoky tones are there to create depth and movement, not to overpower the surface. Keep the darker colors controlled so the finished design stays bright, clean, and balanced. Pour Controlled Ribbons: Pour the White Exotic dirty pour bucket in even ribbons across the countertop. Avoid pouring one large puddle in the center, as this can create heavy color concentration and make the pattern harder to control. Allow the ribbons to connect and level naturally, then spread the material only as needed to achieve full surface coverage. Protect the bright white areas as you work. The white space creates the clean, elevated look that defines this design. Avoid overworking the surface. Too much dark color, excessive blending, or repeated passes can quickly turn the smoky movement into a muddy gray finish. Stop while the design still feels bright, balanced, and intentional. Using APEX Surface Control Finishing Spray, NO TORCH Once colors are applied, the surface is covered, and you’re happy with the look and design of the project, continue to lightly mist APEX Surface Control Finishing Spray while the surface is still wet/workable. The final light spray target should be 30 minutes from the initial mix. When the finishing spray just sits on top of the surface without popping microbubbles, time is up. You can’t hurt the surface by applying too late. The spray will just cease to work. The more you meld the material, the more finishing spray will be needed. Remove Tape Dam and Cover Edges For a dirty pour with a tape dam, plan to pull the tape approximately 30–45 minutes after the initial mix. Do not rely on the clock alone. Watch the material closely. It should be thick enough to hold the edge shape while still fluid enough to flow cleanly over the side. After removing the tape, use a gloved finger to guide material into any dry areas along the edge. Avoid overworking the design. The goal is simply to help the edge finish smoothly and evenly. Scrape Drips and Let APEX Cure Before Sanding or Applying an Optional Top Coat Once the material reaches the gel stage, usually about 90–120 minutes after the initial mix, depending on room conditions and pour thickness, scrape any drips from the underside. Allow APEX to cure 20–24 hours before sanding. APEX can be left without an additional top coat if you are satisfied with the cured surface and all microbubbles were removed during the pour using APEX Surface Control Finishing Spray. To leave APEX as the final finish, sand the cured surface up to 800 to 1000 grit to create an elegant, honed surface. For the most durable, long-lasting finish, you have the option to apply Ultimate Top Coat in either Textured Matte or Textured Gloss. STEP 3 (OPTIONAL): APPLY STONE COAT ULTIMATE TOP COAT If using Ultimate Top Coat, sand the surface and edges before the top coat. o 220 grit before Textured Matte UTC o 320 grit before Textured Gloss UTC Apply Ultimate Top Coat according to Stone Coat instructions if you want a more durable, protective finish for high-use surfaces. Start with 120 grit if microbubbles need to be removed before applying the UTC. APEX looks very elegant as a honed surface and performs great in a bathroom or kitchen, sanded up to 800-1000 grit. Use 7 days as the full cure baseline and follow Stone Coat care guidance. For highly-detailed written instructions, see our Ultimate Top Coat Instructions HERE. Enjoy your new countertops! From all of us here at Stone Coat Countertops, YOU GOT THIS!
Aprende más
Mármol de Carrara epoxi | Encimeras de mármol blanco de Carrara epoxi DIY
Encimera de mármol blanco de Carrara con epoxi DIY Guía Restos de mármol blanco de Carrara Una de las piedras naturales más hermosas del mundo. Su suave color blanco grisáceo... El fondo es ideal para cualquier diseño, tanto tradicional como contemporáneo. Nuestro DIY La guía paso a paso le mostrará cómo crear su propio blanco Encimera de mármol de Carrara utilizando nuestra lista de verificación a continuación. Esto es lo que necesitarás para este proyecto: ● Encimera con revestimiento de piedra [...]
Aprende más
The Future of White Countertops: Redefining What's Possible with Stone Coat APEX
For years, homeowners have been drawn to the timeless appeal of white and light-colored countertops. From classic marble-inspired kitchens to modern minimalist spaces, bright white and light-colored surfaces continue to dominate design trends because they create a sense of openness, reflect natural light, and provide a clean backdrop that complements virtually any design style. Whether inspired by Carrara marble, white quartz, or other modern luxury interiors, white and light-colored countertops remain one of the most requested looks in kitchen and bath remodeling. White and light-colored surfaces also have lasting appeal because they feel elevated and timeless instead of being tied to a short-term trend. That makes them a smart choice for homeowners who want a countertop design they can love now and feel confident about years down the road, whether they stay in the home or it comes time to sell. Despite their coveted looks and vast popularity, white and light-colored countertops have always come with an important question for anyone considering a decorative countertop coating system: Will epoxy yellow over time? The answer has historically been yes. While epoxy countertop systems have transformed the remodeling industry by providing a durable, beautiful, and cost-effective alternative to natural stone surfaces, yellowing has remained one of the most common concerns associated with white and light-colored countertop designs. Today, that conversation is changing. After years of research, testing, and real-world application development, Stone Coat Countertops introduces APEX, a breakthrough countertop coating system engineered specifically to preserve true whites and light-colored countertop designs while delivering exceptional durability and long-term clarity. To understand what makes APEX different, it helps to look at why yellowing has been such a persistent challenge for white and light-colored countertop designs specifically. For a more in-depth look at this topic, read our article, “Why Does Epoxy Yellow?” Why Yellowing has Always Been the Biggest Challenge for White and Light-Colored Countertops Epoxy countertop systems revolutionized surface refinishing by allowing homeowners to achieve the look of natural stone without the expense, demolition, and disruption of a full countertop replacement. Designs that once required costly slabs of marble, quartz, or granite could now be recreated over existing surfaces using decorative coating systems. Homeowners gained access to dramatic veining, rich stone movement, deep gloss, and custom aesthetics at a fraction of the cost of traditional renovations. But for white and light-colored epoxy countertops, one problem kept showing up over time. Early epoxy formulations were highly sensitive to UV light, which could trigger photo-degradation and cause rapid ambering on white and light-colored surfaces. While epoxy technology has improved over time, yellowing has remained a consistent challenge across the industry. Even with the addition of inhibitors, epoxy can still react to environmental factors such as UV exposure, heat, and oxidation, which can create an amber tint over time. This color shift is commonly referred to as yellowing. For darker countertop designs, this gradual shift may not be especially noticeable. But white and light-colored countertops are different. When the goal is a bright, crisp, luminous white or light-colored surface, even subtle discoloration can become visible. A countertop that originally appeared brilliant white can slowly take on warmer cream or ivory tones over time. This challenge has never been unique to a single manufacturer or product line. It has historically been a limitation of the category itself. While manufacturers continually improved durability, workability, and appearance, the reality of long-term discoloration remained the ceiling of the technology. And as white and light-colored countertops became increasingly popular, the demand for a better solution grew stronger. Why White and Light-Colored Countertops Require a Different Approach Today's homeowners are seeking cleaner, brighter, and more refined spaces more than ever before. White and light-colored kitchens continue to dominate design magazines, social media feeds, and renovation shows because they create a classic look that feels both elegant and inviting. They make kitchens feel brighter, cleaner, and more open while still offering timeless resale appeal. Current homeowners are moving away from stark, flat whites and toward warmer, soft whites with natural veining that feel more organic, elevated, and stone-inspired. That shift lines up directly with Stone Coat’s aesthetic, giving customers a way to create the bright marble and natural stone looks they are already searching for. The challenge is that white and light-colored surfaces leave little room for compromise. A color shift that might go unnoticed on a darker countertop can become much more apparent on a bright white design. As a result, homeowners often find themselves balancing their desire for white and light-colored countertops against concerns about long-term performance. At Stone Coat Countertops, that challenge became the driving force behind years of research and development. The goal was not simply to improve existing technology. The goal was to rethink the entire system from the ground up and create a solution specifically engineered for the demands of modern white- and light-stone aesthetics. Introducing APEX by Stone Coat: A Breakthrough in Countertop Coating Technology After years of research, testing, refinement, and real-world application development, Stone Coat Countertops introduces APEX, a breakthrough countertop coating system engineered to redefine expectations for decorative surfaces. APEX is not a reformulation of an existing product. Developed through more than 70 iterations, APEX represents a completely reimagined approach to countertop performance. Every component of the system was designed to work together to deliver luminous, enduring white- and light-stone aesthetics while providing the durability and performance homeowners expect from a premium countertop surface. Rather than trying to manage the limitations of traditional epoxy, Stone Coat built APEX around aliphatic polyaspartic chemistry, a more UV-stable foundation designed to resist the yellowing that has long challenged white and light-colored countertop designs. APEX reflects years of asking difficult questions, challenging long-held assumptions, and pursuing a higher standard for the industry. As Stone Coat Epoxy Pro, Mitch Quist explains, "APEX is the result of revisiting every aspect of the countertop pouring process and asking how we could make it better. We knew the industry deserved more, and we weren't willing to stop until we created a system that raised the standard entirely." That commitment to innovation is what makes APEX more than a product launch. It represents a shift in what's possible for decorative countertop coatings. Is APEX Right for White and Light Countertop Designs? Yes, APEX was engineered specifically to preserve true whites and light-colored countertop designs over the long term. This makes it an ideal option for homeowners seeking bright white, marble-inspired, quartz-inspired, and other light-colored finishes that have traditionally been next to impossible to achieve with epoxy systems. Because APEX is designed to resist yellowing, even in direct sunlight, it gives customers greater confidence when selecting white and light-colored surfaces. According to UV chamber testing done by Stone Coat, APEX is designed to provide 20+ years of color stability, helping maintain the clean, bright appearance of the finished countertop for years to come. An APEX coating is designed to outlast the lifespan of a typical kitchen and offers long-term durability beyond many traditional natural stone options, including marble. Polyaspartic vs. Epoxy: Why the Chemistry Makes the Difference for White Countertops The difference between epoxy and APEX starts with the chemistry. Epoxy systems have improved over the years, often using additives and UV inhibitors to help slow yellowing. But for white and light-colored countertops, managing yellowing is not the same as building the system around a more color-stable foundation from the start. APEX is made with aliphatic polyaspartic technology, which gives the system a more UV-stable base than epoxy. This is why APEX is not just another white countertop coating. The chemistry behind the system helps explain the purpose of each component that follows, from the primer and white dye to the countertop coating and finishing spray. The Complete Stone Coat APEX Countertop System Rather than relying on a single product to solve a complex challenge, Stone Coat developed APEX as a complete, 4-part countertop finishing system. Each component plays a specific role in creating a finished surface designed to preserve true whites and deliver exceptional long-term performance. The system begins with APEX Poly Fuse Countertop Primer, a precision bonding primer engineered to adhere to surfaces such as laminate, tile, cultured marble, granite, metal, and MDF. By concealing underlying colors and patterns while ensuring exceptional adhesion, it establishes a smooth, consistent foundation for the layers that follow. To create the bright, sophisticated appearance homeowners desire, APEX Poly White Countertop Dye blends into the coating to deliver pure white stone aesthetics with exceptional consistency and visual depth. Next comes the APEX Polyaspartic Countertop Coating, an industry-leading UV-stable coating engineered specifically to preserve true whites and light-colored designs. This advanced formulation provides the clarity, durability, and long-term color stability that form the foundation of the APEX system. Finally, APEX Surface Control Finishing Spray promotes bubble release and surface flow without the need for torching, helping create a smooth, seamless finish inspired by the elegance of natural stone. Together, these components form a complete system designed to deliver a level of clarity, confidence, and performance that has historically been impossible to achieve in white and light-colored countertop coatings. A New Era for White and Light-Colored Countertops For years, homeowners who loved the look of white and light-colored countertops had to weigh aesthetics against concerns about long-term discoloration. While decorative countertop coatings delivered incredible value, beauty, and versatility, the limitations of existing technology remained part of the conversation. APEX changes that entirely. Stone Coat APEX was developed to redefine what's possible for white and light-colored countertops. Engineered with long-term color stability in mind, APEX is designed to overcome the yellowing concerns that have challenged epoxy systems for decades, giving homeowners and professionals greater confidence in bright, clean countertop designs. This is not simply a new product entering the market. It is a breakthrough in countertop coating technology. A revelation built on years of research, development, and refinement. Most importantly, it signals a future where homeowners can confidently pursue the bright, luxurious white countertop designs they love without accepting the compromises that have historically accompanied them. The future of white countertops is here. Its name is APEX. If you’re ready to build a white or light-colored countertop that stays true to color, explore the APEX Countertop System and see how Stone Coat makes bright stone and marble looks possible with better clarity and long-term color confidence. Frequently Asked Questions What is APEX? APEX is a next-generation countertop coating system from Stone Coat Countertops, engineered for bright, high-end stone and marble looks with better color confidence, clarity, durability, and long-term performance. Unlike epoxy, APEX is made with aliphatic polyaspartic technology designed to be poured thick, mimic the depth and movement of natural stone, and resist yellowing, even in direct sunlight. The system was built specifically for true whites and light-colored countertop designs, giving customers more control and confidence when creating bright surfaces. Is it possible to apply APEX over existing countertops? Yes. APEX can be installed over existing countertops, including existing epoxy countertops, as long as the surface is solid, stable, and properly prepared. APEX Poly Fuse Countertop Primer is engineered to bond to a variety of surfaces, including laminate, tile, cultured marble, granite, metal, MDF, existing epoxy, and new builds. Each surface may require a different prep path, so follow the approved prep system for the specific countertop you are coating. Do not apply APEX over failing substrates, loose material, peeling coatings, or surfaces that are not structurally sound. Solid and properly prepared is the rule. How long does APEX take to cure? APEX is a fast-curing system designed to reach full cure in approximately seven days, helping reduce downtime while delivering long-term durability. Are white epoxy countertops a good idea? White epoxy countertops can create beautiful marble and quartz-inspired designs. However, long-term color stability has historically been one of the biggest concerns with epoxy systems. APEX was engineered specifically to address those concerns and preserve true white and light-colored aesthetics. How long will my countertop stay white? APEX was engineered specifically to preserve true whites and light-colored countertop designs over the long term. Our UV chamber testing indicates 20+ years of color stability. An APEX coating is designed to outlast the lifespan of a typical kitchen and offers long-term durability beyond many traditional natural stone options, including marble. Are polyaspartic countertops better than epoxy for white and light-colored surfaces? For white and light-colored countertop designs, polyaspartic technology offers a stronger foundation than epoxy because it is more color-stable against UV exposure. That matters on bright surfaces, where even a slight amber tint can be easy to see. Epoxy coatings can yellow over time when exposed to sunlight, heat, and oxidation. While additives and UV inhibitors can help slow that process, APEX takes a different approach by using aliphatic polyaspartic technology as the base of the system. For homeowners who want bright white, soft white, Carrara, or light marble-inspired countertops, APEX provides a better path for long-term color confidence than a traditional epoxy coating.
Aprende más
Why Does Epoxy Yellow?
Epoxy yellows because UV light, heat, and oxidation gradually break down its polymer structure over time, causing the resin to shift from clear to yellow or amber. This is a natural characteristic of epoxy chemistry, not a manufacturing defect, and it affects all epoxy systems to some degree. Understanding why it happens can help you choose the right products, set realistic expectations, and take steps to slow the process. Epoxy is known for its durability and beautiful finish, but yellowing has long been one of the industry's biggest challenges, especially in white and light-colored designs. To understand why, it helps to first understand what causes epoxy to yellow. UV Light and Epoxy Yellowing: The Primary Cause The number one cause of epoxy yellowing is exposure to ultraviolet (UV) light. Epoxy resins are not inherently UV-stable, meaning sunlight gradually degrades their molecular structure. When UV rays hit cured epoxy, they trigger a process called photodegradation. This breaks down the polymer chains within the material, leading to a visible shift in color, typically from clear to yellow or amber. To help slow this process, Stone Coat incorporates UV inhibitors into its formulas. These additives are designed to delay discoloration, not eliminate it entirely. That distinction matters because no epoxy system can remain perfectly clear forever under UV exposure. Even indirect sunlight, like light coming through windows, can cause this effect over time. That’s why you’ll often see yellowing more pronounced near windows, garage doors, or outdoor edges. Do UV Inhibitors Actually Stop Epoxy From Yellowing? UV inhibitors help slow the yellowing process, but they can't stop it completely. There are two primary types used in high-quality coating systems: UV absorbers, which help intercept UV rays before they can damage the epoxy, and HALS (hindered amine light stabilizers), which help interrupt the degradation process after it begins. Stone Coat Countertops formulations utilize advanced UV protection technologies to help maintain clarity and slow discoloration over time. However, even premium epoxy systems will eventually show some degree of ambering when exposed to UV light for extended periods. How do Heat and Oxidation Cause Epoxy to Yellow? UV exposure is the primary driver in photodegradation, but it’s not the only factor. Epoxy is a thermosetting material, which means it continues to respond to environmental conditions even after it cures. Higher temperatures can accelerate the aging process, including the visual change toward a warmer or slightly amber tone. Oxygen also contributes to the same degradation process. Oxidation (reaction with oxygen in the air) alters the chemical structure of the cured resin. Over time, these processes form new chemical groups, such as carbonyl compounds, that change how the material reflects light, giving it that yellow tint. This means even epoxy kept indoors, away from direct sunlight, can still slowly amber as it ages. Epoxy Yellowing Over Time: Why It's Inevitable Even in ideal conditions, epoxy will yellow eventually. This is simply part of the natural lifecycle of epoxies. Think of it less like a material failure and more like a gradual aging process, similar to how wood darkens or finishes patina over time. High-quality epoxies, including traditional countertop systems from Stone Coat Countertops, are formulated with UV inhibitors and stabilizers designed to slow yellowing as much as possible. However, yellowing has remained a known limitation of epoxy chemistry. This challenge is one of the driving forces behind the development of APEX, a new countertop coating technology specifically engineered by Stone Coat to redefine expectations around long-term color stability. Does Epoxy Quality Affect How Fast It Yellows? Not all epoxies yellow at the same rate. The formulation plays a major role: Lower-quality resins tend to yellow faster due to fewer stabilizers and less refined chemistry. Higher-end systems include UV absorbers and HALS (hindered amine light stabilizers), which significantly slow the process. This is why professional-grade countertop epoxies are designed to maintain clarity longer, especially in indoor environments. Can Bad Mixing or Storage Cause Epoxy Yellowing? Yes. Improper storage, handling, and mixing can contribute to premature yellowing, but many of these issues are avoidable with the right preparation and techniques. The hardener component is particularly susceptible to oxidation. Exposure to air, moisture, or excessive heat can cause the hardener to darken over time, which may affect the appearance of the finished surface. For best results, epoxy materials should always be stored according to the manufacturer's recommendations and used within their intended shelf life. Mixing errors can also accelerate discoloration. An incorrect mix ratio, especially when the resin-to-hardener ratio is off, is a well-known contributor to premature yellowing. Inadequate mixing can further affect cure quality, clarity, and long-term color stability. In addition, epoxy resins and hardeners naturally age over time. As materials sit in storage, they can gradually oxidize and develop color in the container, which may become visible in the cured epoxy. For this reason, fresh, properly stored materials typically provide the best clarity and color performance. High-quality epoxy systems manufactured domestically often reach customers sooner after production than products that may spend extended periods in shipping and distribution. Less time in storage can help reduce age-related discoloration and contribute to better overall appearance and performance. Epoxy Color and Design: How Yellowing Visibility Varies One of the most important, and often overlooked, factors when discussing epoxy yellowing is visibility. All epoxy systems will experience some degree of color change over time, but that doesn't mean the yellowing will always be noticeable. Clear, white, and very light-colored surfaces tend to show yellowing the most. In contrast, darker colors, metallic effects, veining, and patterned designs naturally help conceal subtle color shifts. These design elements are excellent choices for creating realistic stone-like surfaces where discoloration is rarely noticed, even after many years of use. Designs that mimic natural stone, a popular choice for epoxy countertops, often age more gracefully because slight color changes blend into the pattern rather than standing out. As a result, the surface maintains its visual appeal for much longer. This is why many professionals have successfully used high-quality epoxy systems for dark or richly colored countertops that continue to look great over time. Historically, however, white epoxy countertops have been approached more cautiously, especially in areas with significant natural light exposure, because even minor yellowing can become visible. Does Epoxy Yellowing Affect Performance? Stone Coat Countertop epoxy systems are formulated as 100% solids epoxy, meaning they cure into a durable, non-porous surface. The structural integrity, strength, adhesion, and performance remains intact, even as the color may shift slightly over time. Can You Prevent Epoxy from Yellowing? You can’t completely stop epoxy from yellowingit, but you can significantly slow it down: Limit direct and prolonged UV exposure Use UV-stable topcoats Choose high-quality, domestically sourced epoxy systems Avoid pure white or clear designs in high-light areas Follow the instructions by measuring accurately and mixing thoroughly These steps can significantly extend the “clear” and natural look of your coating. The Role of Top Coats in UV Protection While no coating can completely prevent UV-related changes, adding a topcoat can help extend the surface's visual life and durability, especially in high-use or high-light environments. Stone Coat Countertops designs their epoxy systems with: UV inhibitors to slow photodegradation 100% solids formulas for stability and durability An optional food-safe topcoat called the Ultimate Top Coat which adds durability, scratch resistance, UV protection, stain resistance, and heat resistance. In many systems, a UV-resistant topcoat is the best way to protect long-term clarity, especially in kitchens, garages, or spaces with natural light. What to Do if Your Epoxy Has Already Yellowed If your epoxy has already developed a yellow or amber tint, the best solution depends on the severity of the discoloration and the condition of the surface. For minor yellowing, sanding the surface and applying a fresh topcoat may help improve the appearance and restore clarity. This approach is most effective when the discoloration is limited to the upper layers of the coating. For decorative projects, some users choose to incorporate additional color, veining, or tints to help disguise yellowing. While this can improve the appearance, it should generally be viewed as a cosmetic solution rather than a permanent fix. For significant yellowing, refinishing or replacing the coating system may be the best long-term option. As the industry continues to evolve, newer technologies, such as Stone Coat APEX, have been developed specifically to address the color stability challenges that have historically affected traditional epoxy systems, particularly in white and light-colored designs. For future projects, the best defense against yellowing is choosing a high-quality coating system like APEX, following proper storage and mixing procedures, and selecting products designed with long-term color stability in mind. APEX by Stone Coat: A New Standard for Color Stability For years, epoxy countertops have delivered an attractive, durable, and cost-effective alternative to natural and manufactured stone. Yet yellowing remained one of the industry's most persistent challenges, especially for white and light-colored surfaces. Stone Coat developed APEX specifically to address that challenge. The Stone Coat APEX Countertop System was engineered with long-term color stability as a core design objective. The result is a countertop coating system designed to preserve bright, clean designs while helping homeowners and professionals overcome the limitations that have historically affected epoxy surfaces. With the introduction of APEX, homeowners and professionals now have access to a new option specifically created to preserve the clean, bright appearance that modern countertop designs demand with color stability that should outlast the life of the countertop. What Makes APEX Different from Epoxy? Unlike epoxy, APEX utilizes aliphatic polyaspartic technology designed to be poured thick while creating the depth, movement, and natural stone appearance decorative countertop coatings are known for. The application process is also different. APEX moves less than epoxy, gels more quickly, uses a no-torch bubble control process, and requires more disciplined timing during installation. These characteristics provide greater control during application and help create consistent results. Rather than relying solely on UV inhibitors and stabilizers to slow discoloration, APEX was engineered from the ground up with color stability in mind, offering a different approach to one of the coating industry's most common challenges. Ready to Build a Countertop That Stays True to Color? If you've always wanted a bright white, marble-inspired, or light-colored countertop but worried about yellowing over time, you're not alone. With polyaspartic technology and engineered specifically for long-term color stability, APEX gives you the confidence to create the white and light-colored designs you've always wanted, without the yellowing concerns that have historically limited epoxy. Your dream countertop shouldn't change color over time. With APEX, it doesn't have to. Learn More About APEX.
Aprende más
DIY Bathroom Upgrades That Look Expensive
Bathrooms quietly shape perception. To guests, buyers, and even yourself each morning, your bathroom surfaces signal whether the space feels outdated or intentionally designed. The good news? You don’t need a full renovation to change that story. With the right surface upgrades - and the right system - you can completely transform your bathroom in a single weekend. Whether you’re searching for DIY bathroom remodel ideas or exploring epoxy bathroom upgrades that look custom and high-end, this guide focuses on the surfaces that create the biggest visual impact: vanity countertops, shower walls, tub surrounds, and cabinets using Stone Coat products. How Can You Upgrade Your Bathroom on a Budget? If you want a high-end look without demolition, focus on the surfaces people notice first: your vanity countertop, your shower walls, and your tub surround. These areas define how your bathroom feels and anchor the design of the entire space. Stone Coat epoxy systems allow you to refinish existing surfaces instead of replacing them, creating a seamless, stone-like finish for a fraction of the cost of a traditional bathroom remodel. Update Your Bathroom Vanity Countertops The vanity is the focal point of your bathroom. It sits directly below the mirror, anchors the space, and is one of the first - and last - things people notice. A full vanity replacement can cost $800–$2,000+, but the most important part of your vanity isn’t the cabinet itself, it’s the surface - the countertop. Guests don’t just see the countertop, they experience it. It’s one of the few surfaces in your home that gets both visual attention and physical interaction. From setting down a bag or a drink to washing hands at the sink, the countertop becomes part of a guest's experience the moment they walk in. Because of that, the countertop does more than complete the space, it reinforces the quality of the entire room. Stone Coat Countertop Epoxy Kits transform the surface you already have into something that looks like high end stone. Pair it with a freshly painted cabinet, and the entire vanity feels brand new without replacing a single piece. Vanity Countertops That Look Like Natural Stone Stone Coat Countertop Epoxy Kits transform laminate, tile, concrete, or even outdated granite or marble into a finish that mimics natural stone, with features such as white marble veining, charcoal metallic stone, or warm, quartz-inspired tones. A vanity countertop is a smaller surface, which makes the entire process more manageable. You’re working with less material, shorter pour times, and a controlled workspace, which lowers both the cost and the pressure. That means you can focus on learning the technique - mixing, pouring, and designing - without the overwhelm of a larger project. It’s a low barrier to entry with a high-end payoff. It’s also a low-risk way to build confidence. The scale gives you more control over your design, more time to react, and a better feel for how epoxy moves and settles. Whether it’s your first project or your first time trying a custom finish, a vanity top gives you the space to get it right. In a single weekend, the most visible and most-used surface in your bathroom can go from outdated to elevated, instantly changing how the entire space feels. From there, it’s easy to build a cohesive look. Stone Coat systems are designed to work together, so you can pair your countertop finish with cabinet paint colors like Midnight Cyprus with White Quartz, Desert Daybreak with Caramel Marble, or Porcelain Moon with Soapstone. The result is a vanity that feels intentionally designed - not pieced together - and a bathroom that reads as clean, consistent, and high-end from top to bottom. Custom Pours and One-of-a-Kind Vanity Finishes Stone Coat Epoxy gives you a true blank canvas - one that allows you to design something entirely your own. Instead of choosing from a limited set of finishes, you’re creating a surface that’s completely unique to your space. With metallic powders, liquid dyes, or luxurious pigment pastes, you can create a finish that no one else has, whether that’s a dramatic black and gold dirty pour, or a soft white and silver blend that feels like high-end quartz. This is where DIY becomes design. And the bathroom vanity is the perfect place to start. You’re working with less material, more control, and a forgiving scale, which makes it easier to focus on technique and design without feeling overwhelmed. At the same time, it delivers maximum visual impact. Update Your Shower Without Re-tiling It Most homeowners assume retiling is the only way to update an outdated shower. A professional shower re-tile typically costs $1,500–$3,000 and involves demolition, dust, and weeks of disruption. Stone Coat’s Epoxy Shower Panel System offers a smarter alternative - one many DIYers don’t realize exists. Instead of working piece by piece - tile, mortar, spacers, leveling, grout - you’re working with full panels that are prepped, coated, and installed as complete surfaces. That shift alone removes a huge amount of complexity from the process. No mixing thinset.No fighting for perfectly even spacing.No coming back later to grout and clean haze. Just clean, controlled steps that are easier to manage from start to finish. Epoxy Shower Walls That Look Like Continuous Stone Each shower panel is coated flat with Stone Coat epoxy, which allows you to focus on your design without the pressure of vertical application. Once cured, the panels are installed to create a continuous, waterproof surface. The result is a seamless, grout-free finish that looks like a single slab of stone. That seamlessness does more than elevate the look, it changes how the space functions: No grout lines means fewer places for moisture to collect Reduced risk of mold and mildew over time Easier, faster cleaning A more modern, high-end appearance It also creates a stronger visual impact. Without breaks or lines interrupting the surface, light reflects more evenly, making the shower feel larger, brighter, and more refined. While the result feels high-end, this is one of the most underused DIY applications in the bathroom space, largely because most homeowners don’t even know it exists. And because the shower system is designed to work with the same epoxy used on countertops, you can carry that finish across your vanity, tub surround, and shower walls. That consistency is what takes a bathroom from a simple update to something that feels fully designed. You’re not just replacing tile, you’re upgrading the entire experience, both visually and functionally. Tub Surrounds That Look Like a Spa A dated fiberglass or tiled tub surround is often the one detail that keeps a bathroom feeling old, and most home owners walk by it every day without realizing it's the eyesore. Using the same Stone Coat Shower Panel System, you can completely transform your surround into a spa-like, stone-inspired feature that belongs in a 5-star hotel. A soft white marble finish can make a basic alcove tub feel bright and elevated. A deep stone tone can add contrast and depth. Either way, the transformation is immediate and impossible to ignore. Pair it with a matching vanity countertop, and the entire room comes together in a single, cohesive look. Key Takeaways The fastest way to upgrade a bathroom is by transforming the surfaces people notice first: the vanity countertop, shower walls, and tub surround. Stone Coat epoxy systems allow you to create stone-like finishes without demolition, contractors, or high costs. A vanity countertop is the easiest starting point for DIYers and delivers immediate visual impact. Shower panel systems eliminate grout lines and create seamless, waterproof surfaces that look high-end. Using the same epoxy system across multiple surfaces creates a cohesive, designer-level result. Bathroom FAQS How Much Does a DIY Bathroom Upgrade Cost? A full bathroom renovation can cost $5,000–$15,000+. By using Stone Coat Countertop Epoxy Kits and Shower Panel Systems and focusing on high-impact surfaces, you can achieve a similar visual transformation at a fraction of the cost. How long do DIY epoxy bathroom projects take? A vanity countertop can be completed in a day, including cure time. Shower panels take about a day to pour and cure before installation. Together, a full transformation is realistic over a 2–3 days. What bathroom upgrades add the most home value? Vanity countertops and shower walls are the first surfaces buyers and guests notice. Upgrading them with a stone-match epoxy finish creates a high-end impression that significantly boosts value. Do epoxy shower walls hold up long term? Yes, when prepped and installed properly. Stone Coat epoxy is waterproof, resistant to mold and mildew, durable, and easy to clean. This makes it a long-term solution for wet environments like showers and tub surrounds. Final Takeaway: Small Bathroom Upgrades, Big Visual Impact You don’t need a full renovation to create a high-end bathroom. By upgrading the surfaces that matter most, you can: Transform the look of your space Increase perceived home value Create a cohesive, designer-level finish The value isn’t just in the materials, it’s in how the space feels when someone walks through the door. And when your surfaces are seamless, consistent, and intentionally designed, everything feels elevated. If you’re looking to boost value beyond the bathroom, explore our guide to Top DIY Upgrades That Improve Your Home’s Value where we break down the highest-impact projects that elevate both function and style throughout your home.
Aprende más
Is Epoxy Flooring Right for Your Garage?
Your garage floor gets seen more than you think. For many homes, the garage is the real front door. It’s where kids come in after school, where groceries get unloaded, where muddy shoes, wet tires, grass clippings, and sawdust all pass through before entering the house. And when the floor is bare concrete, all of that dirt has a way of sticking around. Concrete naturally traps dust, absorbs stains, and sheds fine particles that get tracked into the home. Over time, even a clean garage can start to feel dusty, worn down, or unfinished simply because of the floor underneath it. That’s one reason garage flooring has become such a popular upgrade. Most homeowners underestimate the impact of upgrading their garage floor. The truth is, you don’t need a full renovation to transform the space. You just need the right system. This guide breaks down the pros, limitations, and best-use cases for epoxy garage flooring, and will answer one question: is epoxy flooring the right choice for your garage—and if so, which Stone Coat system gets you there. Why Is Garage Epoxy Flooring Popular? Epoxy flooring is a coating system made from a two-part resin and hardener that cures into a durable, sealed surface over properly prepared concrete. Unlike bare concrete, epoxy flooring creates a surface that’s easier to clean, more resistant to stains, spills, and daily wear, while also offering a wide range of customizable design options to match the style and function of the space. As garages continue evolving beyond simple parking spaces, flooring matters more than ever. Today’s garages are often used as workshops, home gyms, hobby spaces, storage areas, or extensions of the home itself. That shift has fueled increased investment in home improvement and functional living spaces, with garage upgrades becoming one of the fastest-growing home improvement trends. The right epoxy flooring system helps support all of it. The Benefits of Epoxy Flooring in Garage Spaces A garage floor needs to do more than just look good, it needs to stand up to real life. From vehicle traffic and heavy tools to chemical spills, moisture, dirt, and constant foot traffic, garages put more stress on flooring than almost any other area of the home. Stone Coat epoxy flooring systems are designed to handle those demands while still delivering a clean, finished appearance that elevates the entire space. One of the biggest advantages of epoxy flooring is durability. Properly installed systems resist abrasions, impacts, hot tire wear, and many common automotive and household chemicals. Oil, cleaners, road salt, and workshop spills are far less likely to damage the surface compared to bare concrete. Epoxy flooring also simplifies maintenance. Because the surface is sealed and non-porous, dust, debris, liquids, and stains remain on top instead of soaking into the concrete. Sweeping becomes easier, spills wipe up quickly, and the garage stays cleaner with less ongoing effort. Another major benefit is design versatility. Homeowners can choose from a wide range of looks depending on how the garage is used. Decorative flake systems provide texture, traction, and a more utility-focused appearance, while metallic marble systems offer a bold, custom finish for garages designed to feel more like showrooms or hobby spaces. Modern flooring systems have also evolved to better align with homeowner expectations for both performance and application experience. Stone Coat Flooring products are formulated with low odor and low-VOC technology, helping create a more comfortable installation environment compared to many traditional solvent-based coating systems. Combined with DIY-friendly application methods and professional-grade performance, these systems make it easier for homeowners to achieve durable, high-end garage floors without sacrificing usability or design flexibility. The result is a garage floor that balances durability, easier maintenance, and custom design in a way bare concrete simply cannot. The Limitations and Drawbacks of Epoxy Garage Floors Epoxy flooring can dramatically improve the look and function of a garage, but long-term performance depends heavily on proper preparation, installation, and choosing the right system for the space. The biggest issue behind most epoxy floor failures is poor surface preparation. Some industry estimates attribute as many as 80% of coating failures to inadequate prep work. If the concrete is not properly cleaned, repaired, profiled, and tested for moisture, the coating may not bond correctly. Over time, this can lead to peeling, bubbling, cracking, chipping, or delamination. Moisture is another major concern. Concrete naturally holds and transfers moisture, and if vapor is moving through the slab, it can weaken adhesion and eventually cause sections of the coating to lift or fail. Proper moisture testing and primer selection are critical before installation begins. Not every epoxy system performs equally under sunlight or heavy garage use. Standard epoxy coatings can amber or yellow with prolonged UV exposure, especially near garage doors or windows. That’s why Stone Coat epoxy flooring systems incorporate UV-stable polyaspartic topcoats for better long-term color stability and protection. Traffic levels and floor conditions matter too. High-traffic garages, workshop environments, and areas exposed to vehicle movement can experience wear patterns over time. Floors with improper prep or weaker topcoats may become more vulnerable to scratching, peeling, cracking, chemical staining, or hot-tire pickup. Slip resistance is another important consideration that homeowners often overlook. Smooth epoxy surfaces are not naturally slip-resistant and can become slick when wet. For that reason, Stone Coat epoxy floor systems incorporate decorative flake, non-skid grit, or traction additives to improve safety and everyday usability. Installation and curing also require patience. While epoxy flooring may feel dry relatively quickly, full cure and maximum hardness take time. Returning vehicles to the surface too early can compromise long-term durability and increase the risk of damage before the coating has fully cured. Temperature swings can impact performance as well. Some rigid epoxy coatings may become more brittle in extremely hot-and-cold environments, making proper system selection especially important in garages exposed to seasonal temperature changes. And while epoxy floors are highly durable when installed correctly, failed coatings can be difficult and labor-intensive to repair. In many cases, damaged coatings must be mechanically ground off before the surface can be recoated properly. The good news is that most of these issues are preventable. With proper concrete preparation, moisture management, realistic expectations, and the right topcoat system, epoxy flooring can provide years of long-term performance in a garage environment. Types of Epoxy Flooring for Garage Use Stone Coat offers two primary garage flooring systems: Polymer Flake and Metallic Marble. Each is designed for a different aesthetic and use case, while both are finished with a professional-grade polyaspartic topcoat engineered for long-term durability. The decision of which to use largely comes down to how the garage will be used and the type of finish you want the space to have. Some homeowners prioritize durability, traction, and easier maintenance for daily vehicle traffic. Others want a bold, high-gloss showroom-style floor that becomes the centerpiece of the space itself. Type of Floor Polymer Flake Metallic Marble Best For High-traffic, family garages Showroom, statement spaces Finish Textured, multi-tone High-gloss, flowing patterns Traction Built-in with flake broadcast Add non-skid additive DIY Cost $1.99–2.50 per square foot $3–5 per square foot Polymer Flake System The Polymer Flake system is the most popular option for everyday garage environments. This system uses a full broadcast of decorative vinyl flakes over a base coat, which is then sealed with a durable polyaspartic topcoat. The finished surface has a textured, multi-color appearance that helps conceal dirt, dust, tire marks, and everyday wear. Because the flake texture naturally adds traction, this system is especially well-suited for: High-traffic garages Family homes Workshops and utility spaces Garages exposed to water, dirt, or frequent vehicle use For homeowners wanting even greater slip resistance, Stone Coat’s Non-Skid Additive can be incorporated into the topcoat for additional traction. The result is a durable, easier-to-maintain floor designed for real-world daily use. Metallic Marble System The Metallic Marble system is designed for homeowners looking for a more dramatic, high-end finish. This system uses Stone Coat Flooring Epoxy Midcoat tinted with metallic pigments to create flowing, one-of-a-kind movement throughout the floor. The patterns are inspired by natural stone surfaces like marble, granite, and quartzite, giving the garage a custom showroom appearance. The finished surface is high-gloss, reflective, and visually striking, making it popular for: Show garages Collector car spaces Studios and creative workspaces Lower-traffic garages focused on aesthetics Because metallic floors are smoother and more reflective, larger installations often benefit from a non-skid additive in the topcoat to improve traction and everyday usability. Metallic marble systems also require a level concrete surface, since excessive floor pitch or drainage slope can influence how the metallic movement settles during installation. Both flooring systems are protected with Stone Coat’s Polyaspartic Topcoat, designed to provide long-term durability, chemical resistance, UV stability, and years of performance in garage environments. Preparing Your Garage Floor for Epoxy Application Proper preparation - including concrete grinding, cleaning, and thorough moisture testing - is essential to achieve strong epoxy adhesion and prevent finish failure. Skipped prep accounts for up to 80% of coating failures. Before applying an epoxy flooring system, follow these key preparation steps: Repair Existing Cracks and Surface DamageFill cracks, repair spalling, and address damaged concrete before coating application. Mechanically Grind or Etch the SurfaceProperly profile the concrete to improve adhesion and remove contaminants or weak surface material. Test and Address Moisture IssuesCheck for moisture vapor within the slab and use the appropriate mitigation system if needed. Clean and Remove All Dust and DebrisVacuum thoroughly and ensure the surface is clean, dry, and free of oils or contaminants before coating. A properly prepared surface helps improve adhesion, durability, and long-term performance while reducing the risk of peeling, bubbling, or premature wear. For more detailed installation guidance, product recommendations, and step-by-step instructions, homeowners should also reference Stone Coat’s Stone Coat’s instructional flooring pages and installation resources before starting a project, including the existing prep and application guides for additional best practices and troubleshooting tips. How to Install Epoxy Garage Flooring: Best Practices for DIYers Installing an epoxy garage floor comes down to proper preparation, timing, and attention to detail. Stone Coat epoxy systems are designed to help guide DIYers through the process while helping achieve longer-lasting, professional-looking results. Before starting your project, keep these key installation considerations in mind: Follow all recommended cure times before returning the floor to service Monitor temperature and humidity throughout installation and curing Test for moisture before coating the slab Use anti-slip additives or flake systems for improved traction Use UV-stable polyaspartic topcoats in garages with sunlight exposure Work in manageable sections and mix products thoroughly Common installation mistakes include: Skipping grinding or surface preparation Applying coatings over dusty or contaminated concrete Installing outside recommended temperature ranges Parking vehicles on the floor before full cure is complete Ignoring traction needs in wet or high-traffic areas For more detailed installation steps, curing guidance, product recommendations, and troubleshooting tips, homeowners should also reference Stone Coat’s full garage floor installation and application guides before starting a project. Maintenance and Longevity of Epoxy Garage Floors One of the biggest advantages of epoxy garage flooring is its ability to deliver long-term performance with relatively simple maintenance. However, lifespan depends heavily on installation quality, surface preparation, traffic levels, and ongoing care. A high-quality epoxy flooring system installed over properly prepared concrete can last 10–20 years in a garage environment. Systems that incorporate durable polyaspartic topcoats often provide even better long-term resistance to wear, chemicals, UV exposure, and hot-tire pickup. On the other hand, poorly prepared or improperly installed DIY floors may begin showing signs of failure in as little as 2–5 years. Peeling, lifting, premature wear, and coating breakdown are commonly tied to skipped prep work, moisture issues, or inadequate topcoat protection. One reason epoxy flooring remains popular in garages is because maintenance is relatively straightforward. The non-porous surface helps resist stains, mold, moisture intrusion, and many automotive or household chemicals, making cleanup faster and more efficient than bare concrete. Recommended Maintenance Practices To help maximize the lifespan and appearance of the floor: Sweep regularly to remove dirt and abrasive debris Mop occasionally using gentle cleaners and water Clean oil, grease, or chemical spills promptly Avoid harsh abrasives or highly aggressive cleaning tools Use protective pads under heavy equipment when possible Avoid dragging sharp metal objects across the surface In high-traffic garages, periodic topcoat maintenance or recoating may also help extend the life and appearance of the system over time. As flooring technology continues to evolve, newer coating systems are also pushing durability further. Advancements in chemical resistance, UV stability, and flexible coating technology continue improving long-term performance, and future innovations such as self-repairing epoxy systems may further expand the lifespan and resilience of garage flooring. With proper installation and routine maintenance, epoxy flooring can continue performing well long after the initial transformation, helping garages stay cleaner, brighter, and easier to maintain for years to come. Key Takeaways Epoxy garage flooring improves durability, chemical resistance, maintenance, and overall appearance compared to bare concrete Proper surface preparation - including grinding, cleaning, repairs, and moisture testing - is the biggest factor in long-term performance Stone Coat offers two primary garage flooring systems: Polymer Flake: textured, durable, slip-resistant, and ideal for high-traffic garages Metallic Marble: high-gloss, decorative finishes designed for showroom-style spaces Smooth epoxy floors can become slippery when wet, making flake or anti-skid additives important for traction and safety UV-stable polyaspartic topcoats help improve durability, color retention, and resistance to hot-tire pickup High-quality epoxy flooring systems can last 10–20 years with proper installation and maintenance Routine maintenance is simple, with regular sweeping, occasional mopping, and prompt spill cleanup helping preserve the finish over time FAQ How much does epoxy garage flooring cost? The cost of epoxy garage flooring depends on the system, garage size, and whether the floor is professionally installed or completed as a DIY project. Professional epoxy flake flooring installations typically range from approximately $5–7 per square foot, while professional metallic marble systems often range from $15–19 per square foot due to the additional labor and artistic application involved. For a standard two-car garage, that can place professionally installed systems anywhere from roughly $2,000–$7,600 depending on the finish selected. Stone Coat DIY flooring kits significantly reduce those costs. Polymer flake systems generally range around $1.99–2.50 per square foot, while metallic marble systems typically range from $3–5 per square foot. For many homeowners, that can result in savings of approximately 60–75% compared to professional installation. How long does epoxy flooring last? A high-quality epoxy flooring system can last 10–20 years in a garage environment when installed correctly and properly maintained. Longevity depends heavily on surface preparation, moisture control, traffic levels, and topcoat quality. Systems like Stone Coat epoxy with durable polyaspartic topcoats generally provide better long-term resistance to wear, UV exposure, chemicals, and hot-tire pickup. Lower-cost DIY systems or thinner water-based epoxy coatings may only last 3–5 years before showing signs of wear or failure. Is epoxy flooring slippery or safe for garages? Smooth epoxy finishes can become slippery when wet, especially in garages exposed to water, rain, or vehicle runoff. To improve traction and safety, many garage flooring systems incorporate decorative flake, anti-slip grit, or traction additives into the topcoat. Polymer flake systems naturally provide more texture underfoot, making them a popular choice for family garages and high-traffic spaces. With the proper traction additives, epoxy flooring can provide a safe and durable garage surface for everyday use. How long do I have to stay off the floor after applying epoxy? With Stone Coat epoxy flooring systems, light foot traffic is typically possible after approximately 24–36 hours under proper curing conditions. However, full cure takes significantly longer. Homeowners should wait at least 7 days before parking a vehicle on the surface. For the first 30 days, it’s also recommended to avoid turning the steering wheel while the vehicle is stationary, as this places additional stress on the coating before full hardness is achieved. Allowing the system to fully cure is one of the most important steps in achieving long-term durability and performance. Will epoxy flooring hold up to hot tires? Standard epoxy coatings can be susceptible to hot-tire pickup, where heat and vehicle weight cause sections of the coating to soften and peel as tires pull away from the surface. Using a high-quality polyaspartic topcoat, like the one included in Stone Coat epoxy flooring systems, helps significantly reduce this risk by improving heat resistance and overall durability. Proper concrete preparation, correct installation, and allowing the floor to fully cure before vehicle use are also essential to long-term performance.
Aprende más
DIY Upgrades to Improve Your Home's Value
Walk into any home, and the story reveals itself instantly. Not through square footage or layout, but through surfaces. Countertops, floors, walls, and finishes quietly signal whether a home feels outdated or intentionally designed. Top DIY Upgrades That Improve Your Home's Value If you walk through your own home and notice rooms that need a little TLC - worn countertops, stained floors, or finishes that feel stuck in another decade, you’re not alone. Those are the exact details that shape how a space feels, both to you and to anyone who walks through the door. The good news? You don’t need a full renovation to change that story. Upgrading surfaces is one of the fastest and most cost-effective ways to increase perceived home value without a full renovation. Stone Coat flooring, countertop, and shower systems are designed to make those upgrades accessible for DIYers. This guide covers the four spaces that deliver the biggest impact: the kitchen, bathroom, garage, and utility areas, and why upgrading surfaces in these rooms creates a ripple effect throughout your entire home. What Rooms Offer the Most Return on Investment for DIY Projects? The rooms that offer the most return on investment for DIY projects are high-use, high-visibility areas such as the kitchen, bathroom, garage, and utility spaces. These spaces have the greatest impact on how a home’s value is perceived. The kitchen - the heart of the family. Where meals are shared and conversations abound. The bathroom - tiny but mighty. This small space has high impact - and a view from the throne. The garage - your “other” entryway. Often overlooked but highly visible - que your open doors from spring to fall. The utility spaces - the workhorses. These daily-use areas signal how a home is organized and maintained. Each of these rooms shares one thing in common: they are surface-driven spaces. What you see - and what you use - is defined by countertops, floors, and wall finishes, not the structure behind them. When those surfaces look worn or outdated, the entire room feels that way. When they’re clean, cohesive, and well-finished, the space instantly feels elevated. And that’s where Stone Coat systems stand apart. Instead of tearing out and replacing materials, you’re upgrading what’s already there - refinishing existing surfaces with high-performance epoxy and coatings designed for durability, design flexibility, and long-term use. That means no demolition, no major downtime, and no need to rebuild what’s still structurally sound. It also means you’re not limited to standard, off-the-shelf options. You can create custom finishes that match your style while improving how the surface performs day to day. The result is a space that doesn’t just look updated, it feels intentional, functions better, and holds up to real-life use. 1. DIY Kitchen Upgrades The kitchen is where people decide how they feel about a home. Does the space feel warm and welcoming? Does it feel clean and well maintained? Or are dingy, stained surfaces the first thing they see? Dated surfaces like laminate countertops, worn cabinets, and mismatched finishes instantly communicate age. Updated surfaces do the opposite; they create a sense of cleanliness, quality, and intention. Epoxy Kitchen Countertops A standard countertop can make a kitchen feel forgettable. The same surface, refinished with Stone Coat epoxy, can become the centerpiece of the room. Stone Coat Countertop Epoxy Kits are engineered to bond to existing surfaces like laminate, tile, wood, and concrete. Instead of replacing, you’re creating a new surface layer that mimics the depth and movement of natural stone. Countertop Kits allow you to not only upgrade the quality of your kitchen, but the design. They give you control over both performance and appearance, turning existing surfaces into durable, non-porous finishes while allowing you to create a completely custom look. From soft, natural marble veining to bold, high-contrast stone patterns or clean, modern solids, epoxy lets you design a surface that fits your space instead of settling for what’s available off the shelf. That being said, this isn’t just cosmetic. Epoxy creates a non-porous, durable surface that resists moisture, staining, and everyday wear, making it ideal for high-use environments like kitchens. Stone Coat is heat resistant, helping protect against hot pans and daily temperature changes, while maintaining its strength and finish over time when properly cured and cared for. Buyers notice countertops first. Guests photograph them. And when done right, they shift the entire perception of the space from “dated” to “designed.” Kitchen Cabinet Paint Cabinets take up the most visual space in your kitchen. If they look outdated, the entire room feels outdated. Because they dominate the sightline, cabinets set the tone for the entire space. Dated colors, worn finishes, or visible wear can make a kitchen feel tired, even if the layout works and the appliances are in good shape. On the flip side, clean, updated cabinets instantly make the room feel brighter, more modern, and more cohesive. Stone Coat Cabinet and Furniture Paint is formulated to deliver a smooth, self-leveling finish that eliminates brush marks and creates a clean, professional look. It’s one of the highest-impact changes you can make without altering the footprint of the kitchen. Beyond appearance, it’s built for performance: Resists chipping and scratching Holds up to moisture and frequent use Maintains color and finish over time When cabinets and countertops are upgraded together, the result is a clean, professional look that instantly modernizes the space. The transformation feels cohesive, like a full renovation without the cost or disruption. 2. DIY Bathroom Upgrades Bathrooms may be smaller in size, but they carry a disproportionate impact. They’re one of the most frequently used spaces in the home, and one of the first places people notice signs of age or wear. Every surface is visible. Every detail is amplified. Unlike larger rooms where elements can blend together, bathrooms put everything on display. Countertops, walls, fixtures, and finishes all sit within a tight visual field. That means outdated materials, stains, or mismatched finishes stand out immediately. Because of that, even small DIY bathroom upgrades can completely change how a space feels. A refreshed countertop or freshly painted vanity can shift the room from basic to elevated without changing the layout. It’s one of the few spaces where targeted surface upgrades deliver a fast, noticeable return, making the entire home feel more updated and well cared for. Epoxy Bathroom Countertops Builder-grade vanity tops tend to feel generic. With epoxy, they become custom. The same surface, refinished with Stone Coat epoxy, can elevate the space, making it look like it belongs in a boutique hotel. Because bathroom surfaces are smaller, they’re often one of the best entry points into epoxy projects, allowing you to experiment with design while achieving a high-end result. Popular looks include: Bright marble styles that reflect light and open up the space Deep, moody tones for a modern, elevated feel Warm, natural stone finishes for a spa-like atmosphere The transformation is immediate, and because epoxy is seamless, it eliminates the visual breaks that make surfaces feel pieced together. Epoxy Shower Walls Traditional shower upgrades often mean demolition, tile work, and ongoing grout maintenance. That process typically involves tearing out existing materials, dealing with dust and downtime, and coordinating multiple steps - backer board, waterproofing, tile installation, and grouting - before the space is usable again. Even after the install, tile showers come with long-term upkeep. Grout lines can discolor, absorb moisture, and require regular cleaning or resealing to maintain their appearance. Over time, those small maintenance points add up. That’s why many homeowners are looking for alternatives that deliver the same high-end look without the complexity. The Stone Coat Shower System is a seamless surface system that eliminates grout lines altogether, creating a continuous finish that’s easier to clean, more resistant to moisture, and visually more modern. It’s a simpler path to achieving a polished, durable shower space without the extended timeline of a traditional remodel. By creating seamless, grout-free shower walls, you get: A continuous stone-like appearance Easier cleaning and maintenance Reduced risk of moisture intrusion through grout lines This upgrade does more than improve aesthetics, it improves functionality. And because it’s less common in DIY remodels, it’s often the feature that stands out the most. 3. DIY Garage Upgrades A garage isn’t just a storage space; it’s one of the first areas people see when they enter your home. For many homes, it functions as the primary entry point, setting the tone before anyone steps into the main living space. And yet, it’s often the most neglected. Clutter, stained concrete, and unfinished surfaces can make the entire home feel less cared for, even if the rest of the interior is updated. The garage has a direct impact on perceived home value because it reflects how the home is maintained as a whole. It’s not just about appearance. It signals organization, upkeep, and usability. Bare concrete tells a story of neglect. A finished epoxy floor tells a story of care and intention. It shows that the space has been considered, upgraded, and designed to handle real use, transforming the garage from an afterthought into a functional, finished extension of the home. Epoxy Garage Floors Stone Coat Epoxy Floor Kits are designed to: Seal and protect concrete from moisture and wear Improve durability against impact and chemicals Create a clean, cohesive look Design options range from flake systems to metallic finishes, allowing you to customize the space based on how you use it. A finished epoxy garage floor doesn’t just look better - it expands how the space can be used: Home gym Workshop Organized storage area It turns “extra space” into usable space. Epoxy Workbench and Utility Surfaces The garage transformation doesn’t stop at the floor. A sealed epoxy work surface adds: Chemical resistance Easy cleanup A polished, finished look When floors, workbenches, and storage areas align visually, the garage becomes an extension of the home, not an afterthought. 4. DIY Laundry Room and Mudroom Upgrades Utility spaces are the hardest-working spaces in your home and often the least considered, but they play a major role in how your home feels and functions day-to-day. Upgrading them doesn’t just improve appearance, it improves performance. From easier cleaning and better durability to more efficient, organized workflows, these upgrades turn overlooked areas into functional, finished spaces that support the way you actually live. Epoxy Utility Countertops Laundry rooms and mudrooms deal with moisture, mess, and constant use - think after-school drop zone meets minor league locker room. Stone Coat Countertop Epoxy transforms basic laminate counters into waterproof, stain-resistant surfaces that can handle everything from laundry to pet care. The result is a clean, seamless workspace that feels organized and intentional. These are the spaces where durability matters most—and where epoxy delivers its best performance. Epoxy Utility Room Floors An unfinished floor can make even a clean space feel incomplete. A sealed epoxy floor: Brightens the room Makes cleaning faster and easier Creates continuity with the rest of the home For homeowners and rental hosts, these details matter more than most realize. They signal cleanliness, care, and quality. Why These Upgrades Work The value isn’t just in the materials, it’s in the perception they create. When surfaces are consistent, clean, durable, and intentionally designed, the entire home feels more finished and more valuable. There’s a sense of cohesion that people notice immediately, even if they can’t always explain why. Instead of rooms feeling disconnected or updated at different times, the home reads as one complete, well-thought-out space. That perception matters. It influences how homeowners feel living in the space, how guests experience it, and how buyers evaluate it. Clean lines, seamless finishes, and durable surfaces signal care, quality, and longevity - all key factors in perceived value. And because Stone Coat epoxy systems allow you to apply the same core process across multiple rooms, you gain something even more powerful: consistency. You’re not reinventing the wheel with every project; you’re building a repeatable approach that creates alignment from the kitchen to the garage to the utility spaces. That’s what separates a collection of upgrades from a cohesive transformation. It’s not just that each space looks better—it’s that everything works together, creating a home that feels intentional, elevated, and complete. Key Takeaways The surfaces in your home define how it feels—and how valuable it appears You don’t need a full renovation to create a high-end result Refinishing surfaces is often more cost-effective and impactful than replacing them Kitchens and bathrooms drive the biggest perception shifts, but garages and utility spaces complete the story Consistency across spaces creates a home that feels intentionally designed The most valuable upgrades aren’t always the biggest.They’re the ones that change how a space feels the moment you walk into it. With Stone Coat Countertops, you’re not replacing your home’s surfaces, you’re redefining them. And once you transform one room, it becomes easy to see what’s possible everywhere else.
Aprende más
¿Cuánta resina epoxi necesito para las encimeras?
¿Te preguntas cuánta resina epoxi necesitas para tu proyecto de encimera? Esta guía de Stone Coat Countertops desglosa la cobertura de epoxi por pie cuadrado, explica las técnicas de vertido para mármol exótico en comparación con las técnicas de mármol fresado a mano y te ayuda a planificar el vertido con confianza, para que obtengas una cobertura completa, menos desperdicio y resultados profesionales en todo momento.
Aprende más